Create a Video in 10 Minutes
This guide outlines the steps to create an AI-generated video using Whatmore AI Studio, from logging in and selecting content type to customizing models, poses, and applying mood boards.
You can create custom videos for all your marketing and product display needs. Customize these images to your liking with numerous options, including aspect ratio, clothing, product details, model ethnicity, model selection, and various poses.
Use Cases
Quick Catalog Videos for New CollectionsImagine you are an e-commerce manager who just received a new clothing collection. Instead of scheduling a costly video shoot with models, photographers, and stylists, you can instantly create on-brand catalog videos using AI Studio. These videos can feature models of your choice, in poses that best display your products, styled with mood boards that reflect your campaign’s theme.
This saves both time and budget, allows you to localize videos for different markets, and speeds up campaign launches.
Seasonal Campaigns and PromotionsThink about a fashion brand preparing a seasonal promotion, such as a holiday sale or summer collection launch. Traditionally, this would require themed sets, decorations, and multiple days of video production. With AI Studio, you can generate videos that place your products in festive, seasonal, or cultural contexts in just minutes.
For example, you can showcase your clothing line in a beach setting for summer, a cozy indoor scene for winter, or a lively street celebration for holidays. This helps your campaigns feel timely and engaging—without the cost and delays of organizing special shoots.
Access the Studio
To access the studio:
-
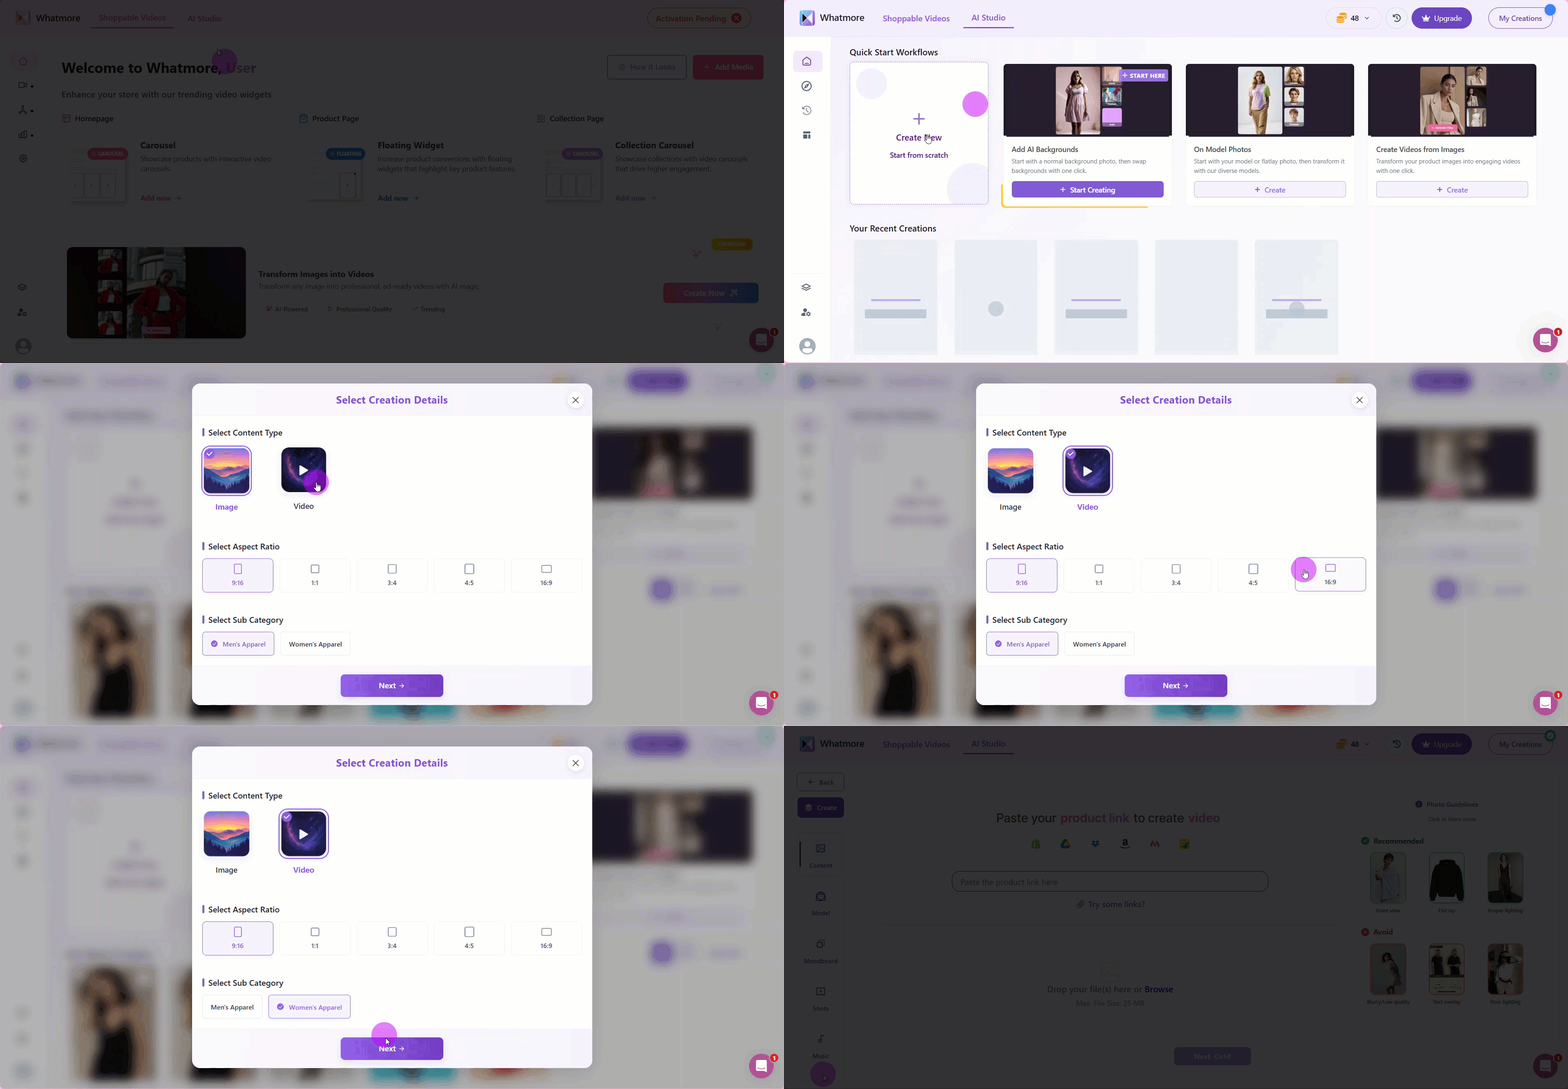
Log in to your Whatmore and click on the AI Studio tab. Ensuring that you are logged into your account allows you to track your projects, use your credits correctly, and access saved models, templates, and configurations.
-
Click Create New to start a new workflow.
-
Select Video under Select Content Type.
-
Select the aspect ratio that best suits your content. Correctly defining the type of content and the proportion ensures compatibility with distribution channels and avoids the need for rework. For example, a 1:1 ratio is ideal for Instagram.
-
Select the apparel category of your preference: Men's apparel or Women's apparel. By selecting the right category, you ensure that the AI applies the correct styling, fit, and context to the generated visuals, resulting in more realistic and relevant videos that truly reflect your product.
-
Click Next.
Input Product Details
From this data, AI will be able to understand the visual and contextual characteristics of the product, generating realistic and relevant videos.
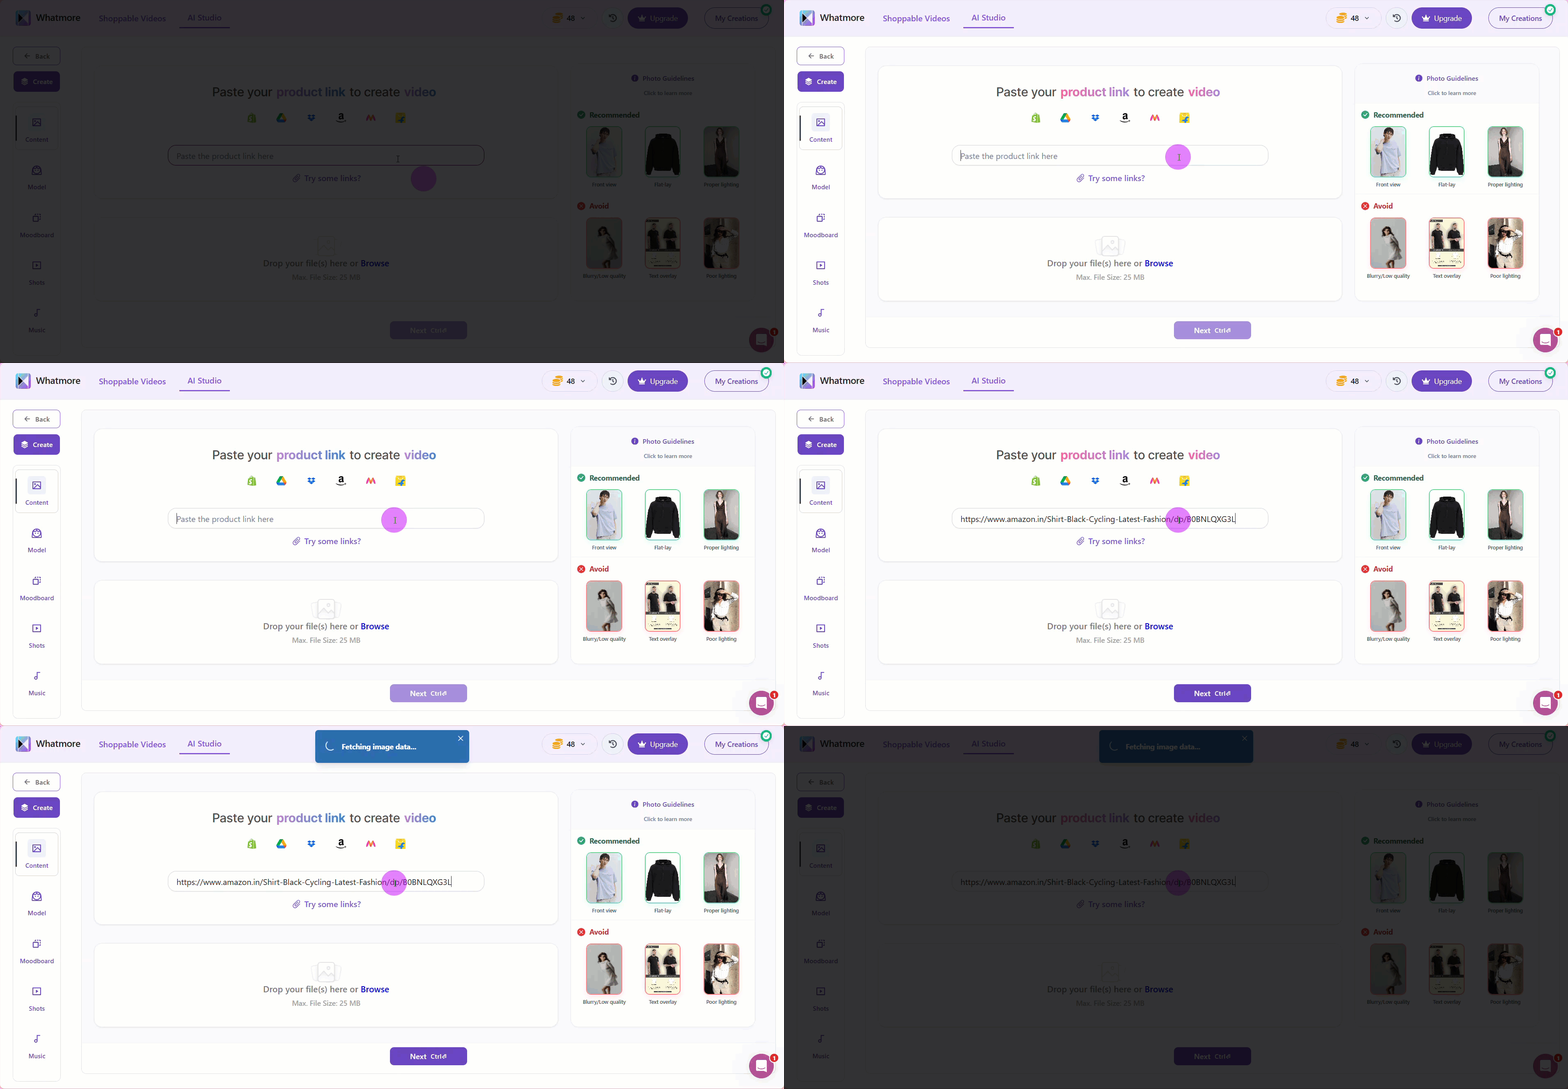
- Enter the URL of the product you want to create a video for. Make sure that the URL contains all the visual and textual information about the product (such as color, material, and style). This directly influences the quality of the video generated.
The URL must be from a supported platform (Shopify, Amazon, Flipkart, Myntra, Google Drive, Dropbox).
- Alternatively, you can upload your own product images directly from your computer.
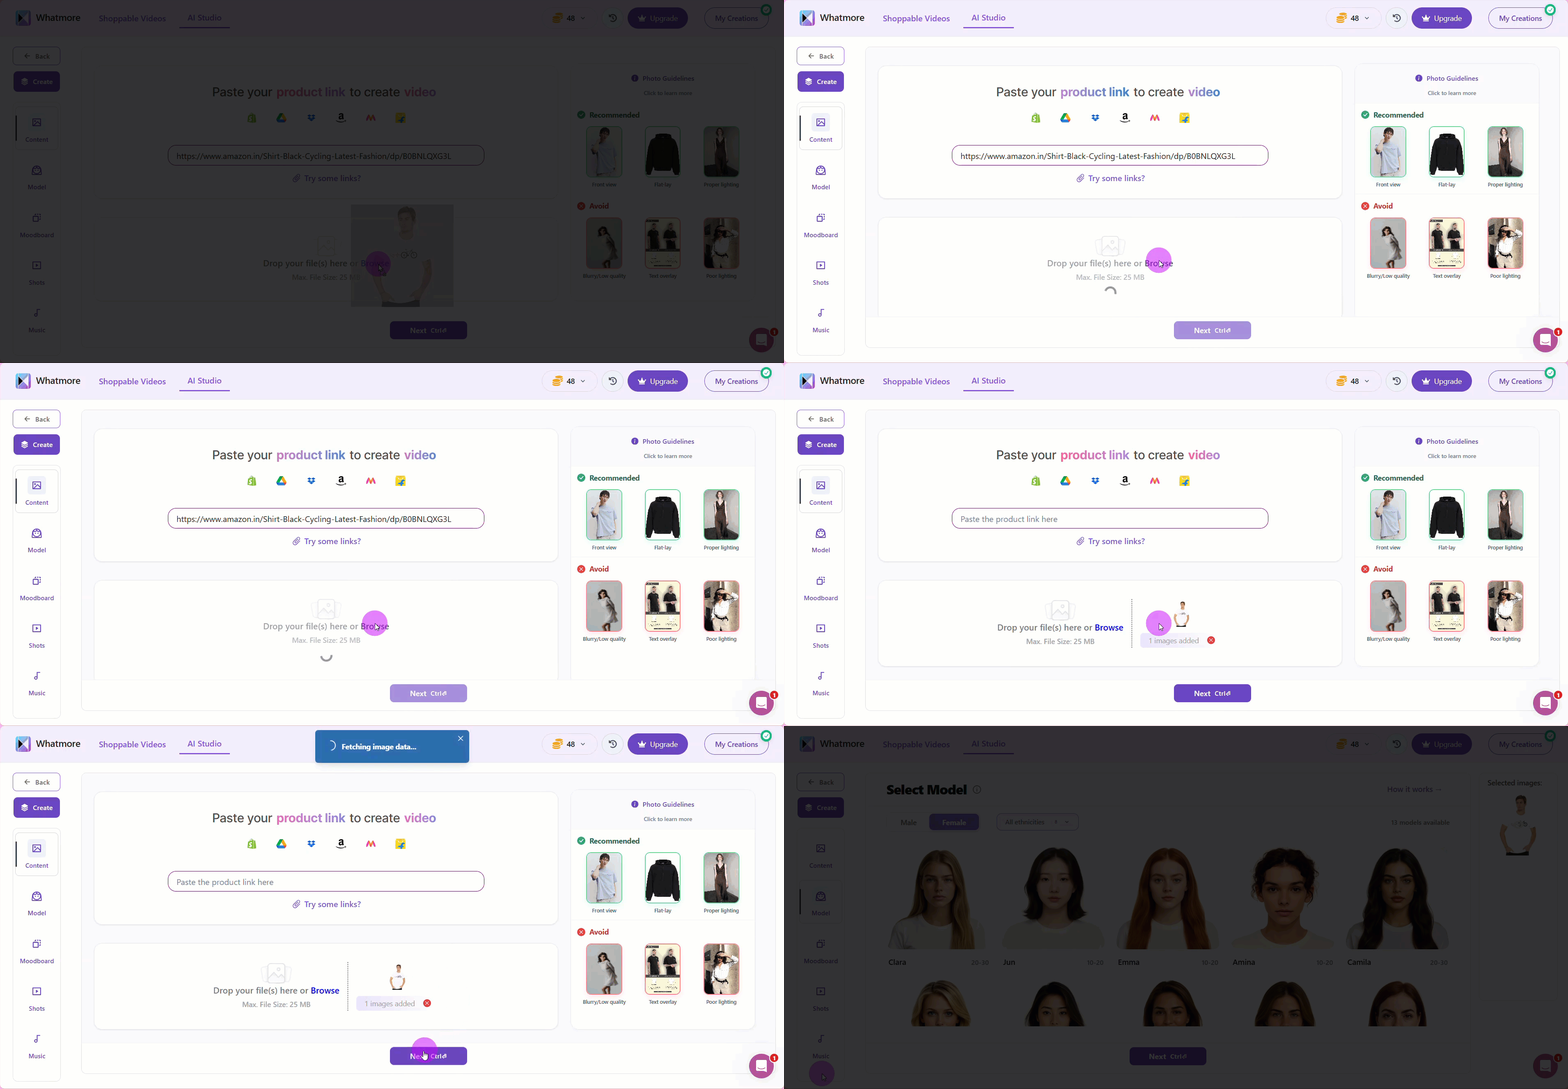
- Click Next to move forward.
Customize Your Model
Selecting the right model allows you to represent your target audience better, promoting identification and inclusion - key aspects for fashion and e-commerce campaigns.
Using different models is also ideal for A/B audience segmentation tests or when the brand has specific visual representation guidelines.
To customize your model:
-
Select the desired ethnicity.
-
Choose a specific model.
-
Click Next.
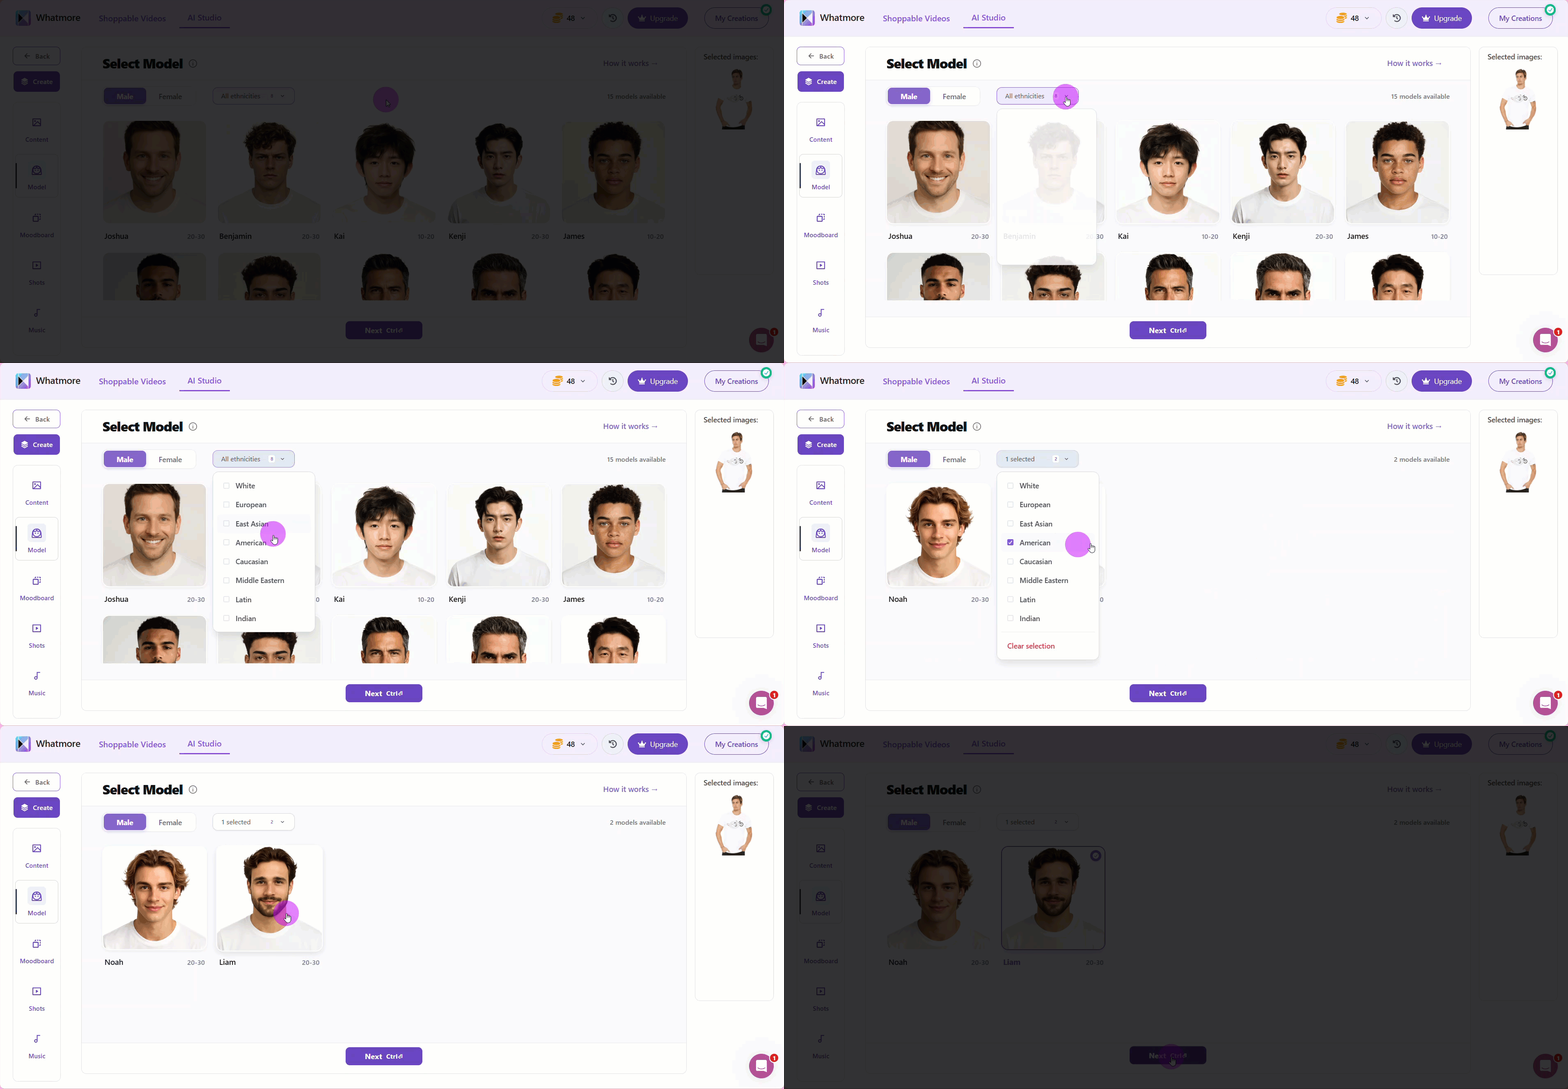
Below each model, you’ll see an age range that represents the demographic the model is designed to reflect. This helps you select models that best match your target audience, ensuring your content feels relatable and authentic. For example, if you’re promoting activewear for young adults, you might choose a model in the 18–25 range, while for professional attire, a 30–40 range might be more effective. Selecting the right age group strengthens the connection between your product and the audience you want to reach.
Apply a Moodboard
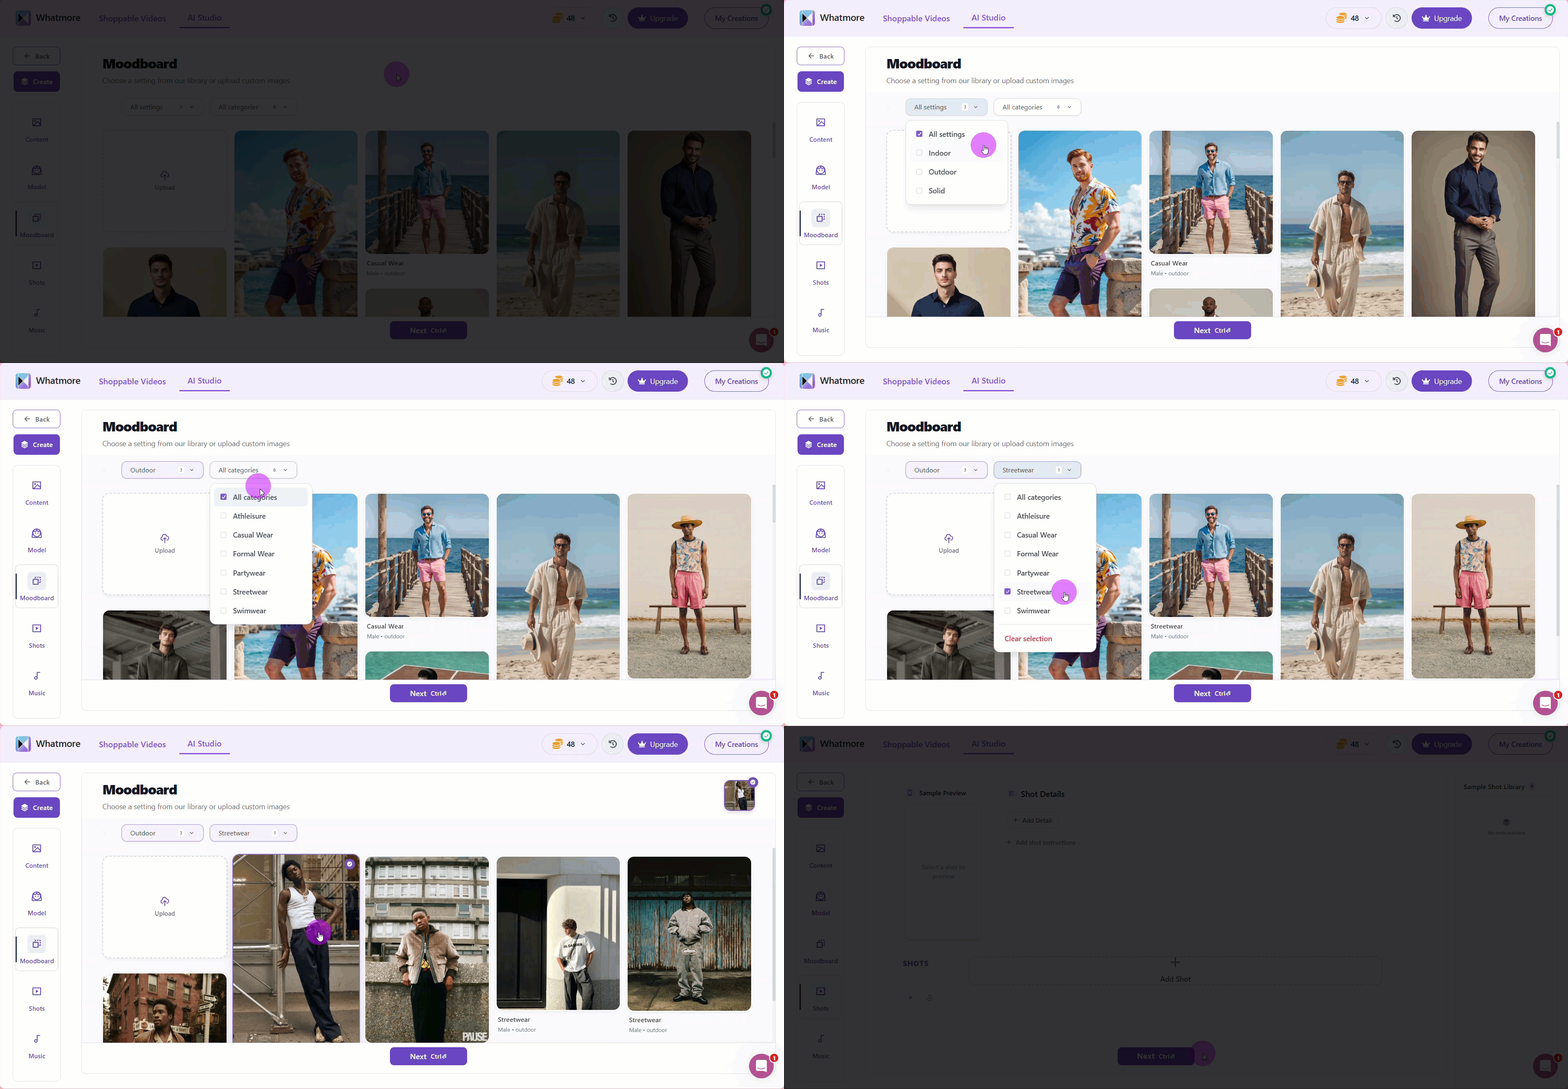
The mood board sets the visual scene for your video, placing your product in a context that enhances its appeal—whether that’s a bustling street, a minimalist studio, or a sunlit beach. By creating a consistent and engaging environment, your videos feel more professional and help viewers connect with the product. Before applying a mood board, review your brand guidelines and color palette to ensure the visuals align with your campaign’s style and messaging. To set your moodboard:
- Filter backgrounds by setting:
-
Indoor – Perfect for studio-style shoots, home environments, or office contexts. Ideal for controlled lighting and a polished look.
-
Outdoor – Includes streets, parks, beaches, or urban settings. Great for lifestyle or seasonal campaigns where natural surroundings enhance the product.
-
Solid – Simple, single-color backgrounds. Useful for minimalistic videos, product focus, or when you want to overlay text or graphics.
- Filter the type of wear in All categories:
-
Athleisure – Relaxed and sporty movements, ideal for gym, yoga, or casual activewear videos.
-
Casual Wear – Everyday outfits shown in natural, approachable motions for lifestyle-focused videos.
-
Formal Wear – Elegant and composed movements, suited for office attire or business-themed campaigns.
-
Partywear – Dynamic, energetic motions that reflect festive or celebratory settings.
-
Streetwear – Trendy and expressive poses, emphasizing style and urban lifestyle.
-
Swimwear – Comfortable, open movements perfect for beach, pool, or resort-themed videos.
Selecting the correct wear type ensures your video highlights the clothing in a way that matches its intended use and audience.
-
Select the image you want after filtering the results.
-
Select Next to move forward.
Shots
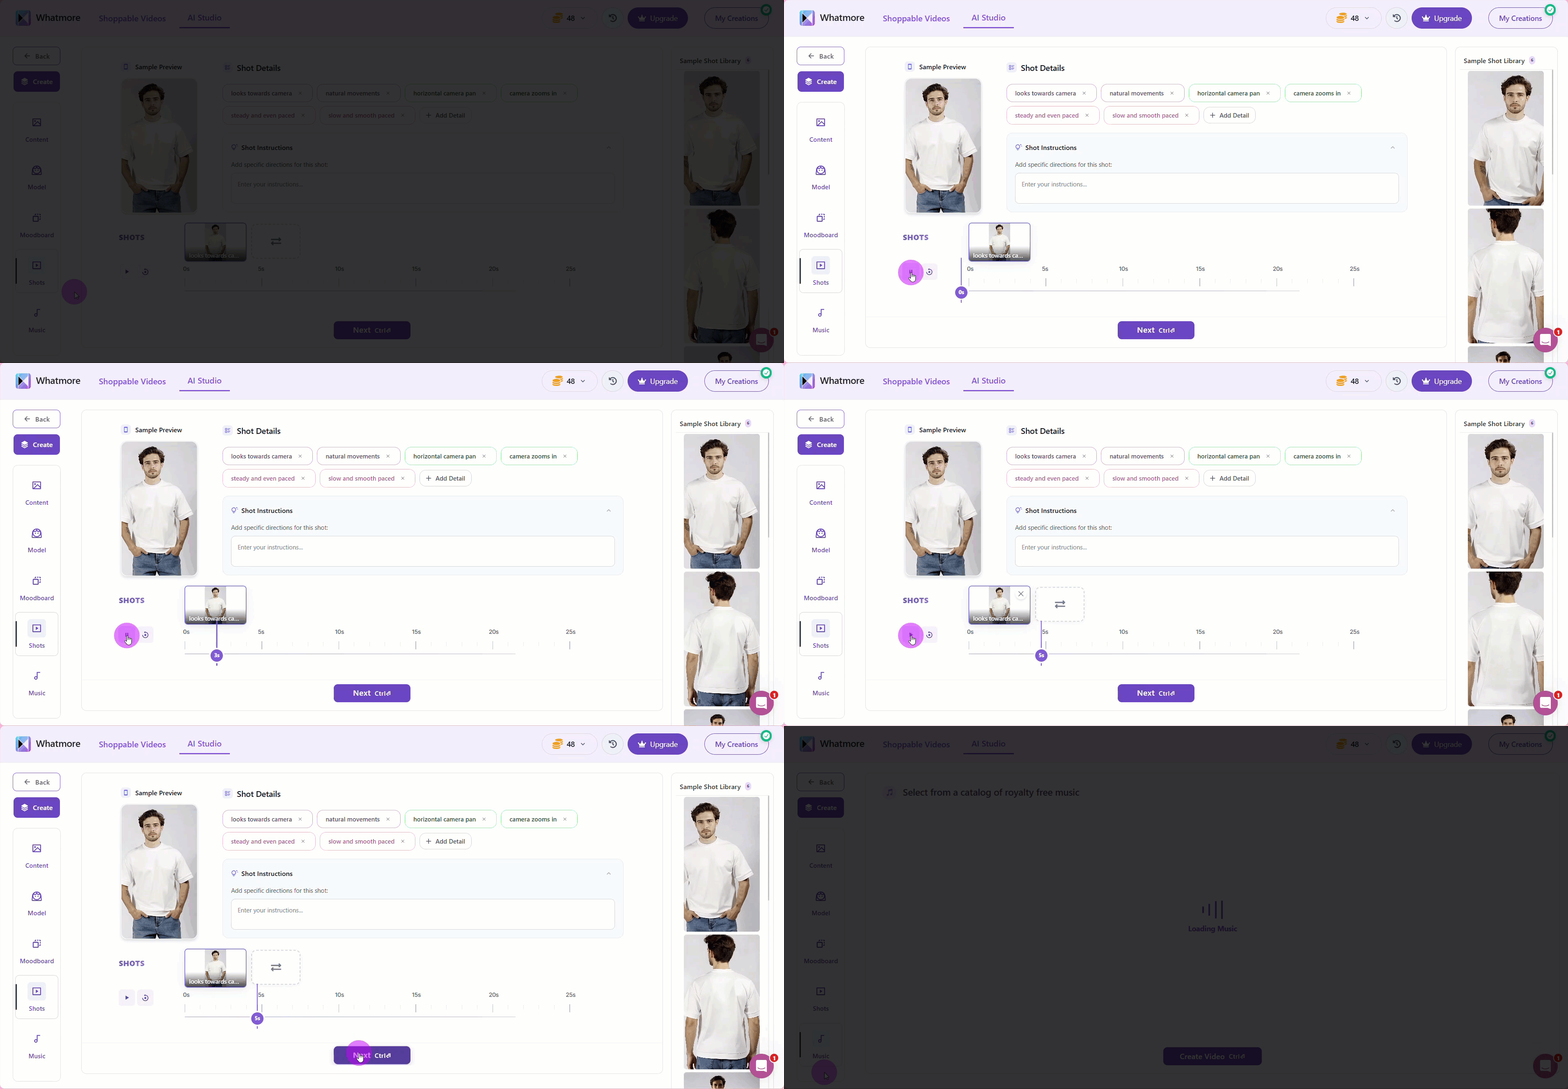
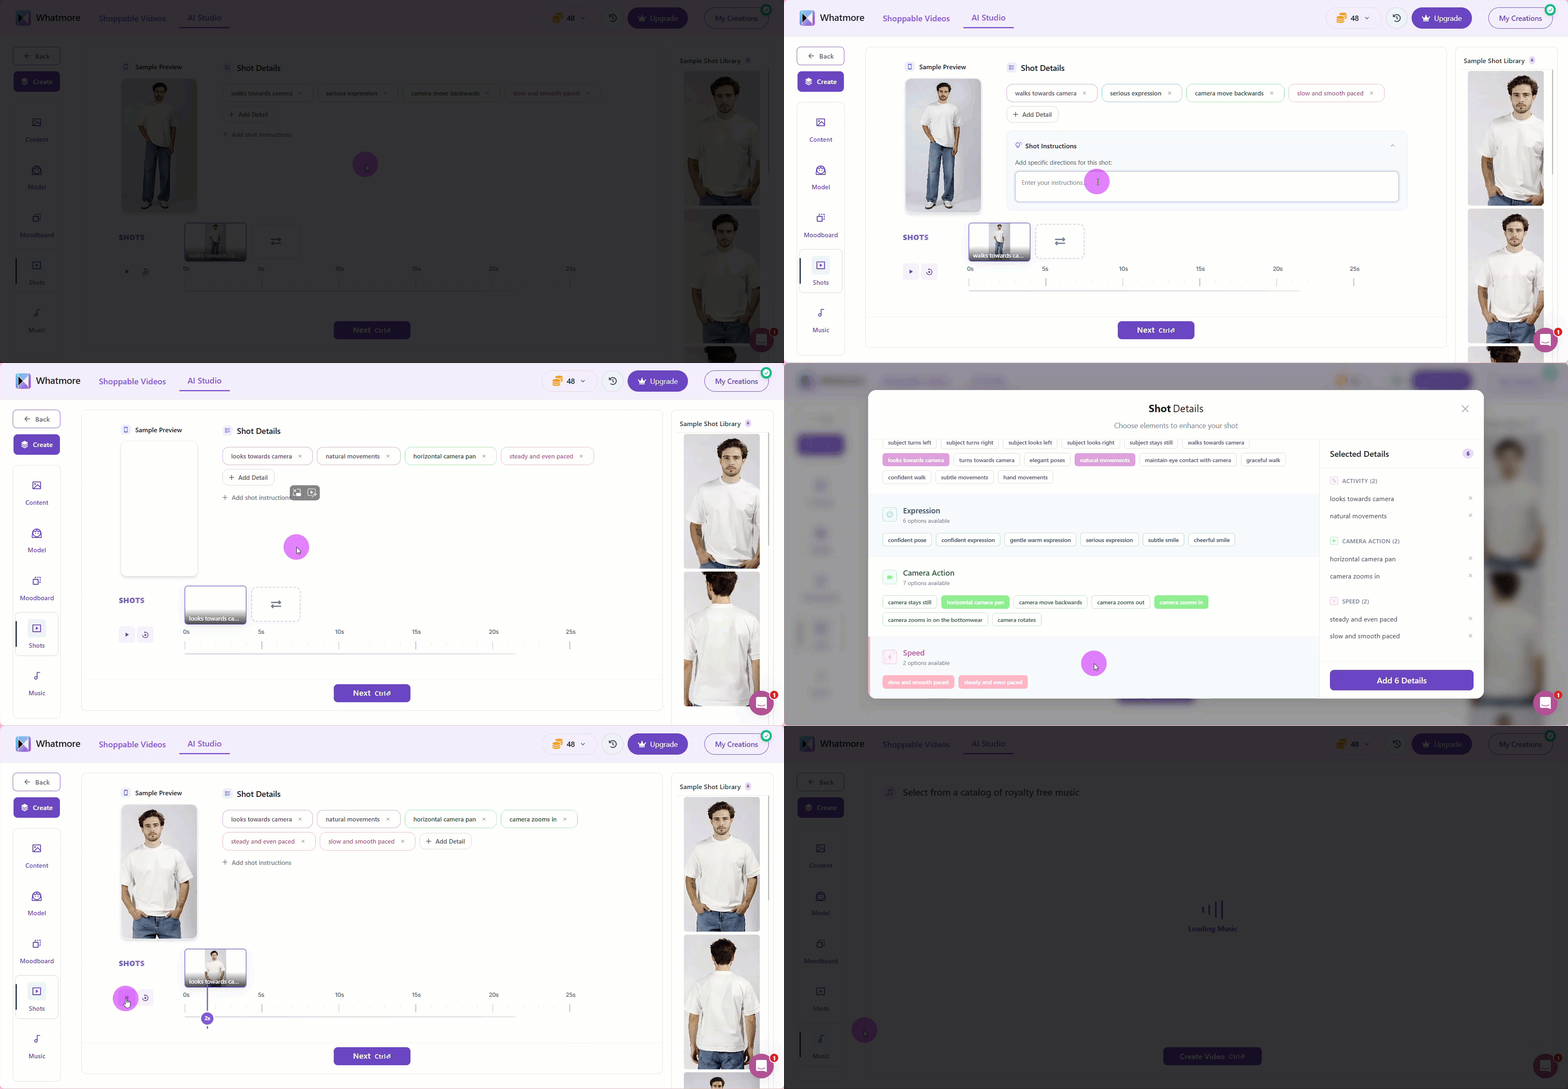
The Shots section lets you define how your video model will move and interact on screen. Here, you can select from pre-designed motions or pose sequences, such as walking, turning, sitting, or gesturing naturally, to best showcase your product.
You can also provide specific instructions to the AI, guiding it to focus on particular actions, camera angles, or pacing. For example, you might request a close-up on details like fabric texture, a slow pan to highlight the fit, or dynamic movements for lifestyle videos. Using this feature ensures your videos are tailored to your campaign’s goals, making them more engaging and professional.
Follow these steps to customize your shots:
-
Select + Add Detail to enhance your shot with specific elements:
-
Activity – Choose model movements, such as walking toward the camera, turning, or performing elegant poses.
-
Expression – Set facial expressions or emotions, such as confident, warm, or smiling.
-
Camera Action – Define camera movements, like a stationary shot, horizontal pan, or zoom-in.
-
Speed – Adjust the pacing of the shot, from slow and smooth to dynamic and steady.
-
-
Click Add Details to confirm your selections.
-
Optional: Select + Add Shot Instructions to enter a detailed description for specific directions if you want the AI to follow precise movements, angles, or actions. For example: Have the model walk slowly toward the camera, then pause and turn to the right. Make sure she smiles gently and the camera zooms in slightly to highlight the jacket’s texture.
-
Click the play icon to preview and control the duration of your video shot.
-
Click Pause to set the desired length.
-
In Sample Shot Library you can browse example shots to find inspiration or templates that suit your video style.
-
Click Next to proceed to the next step.
Music
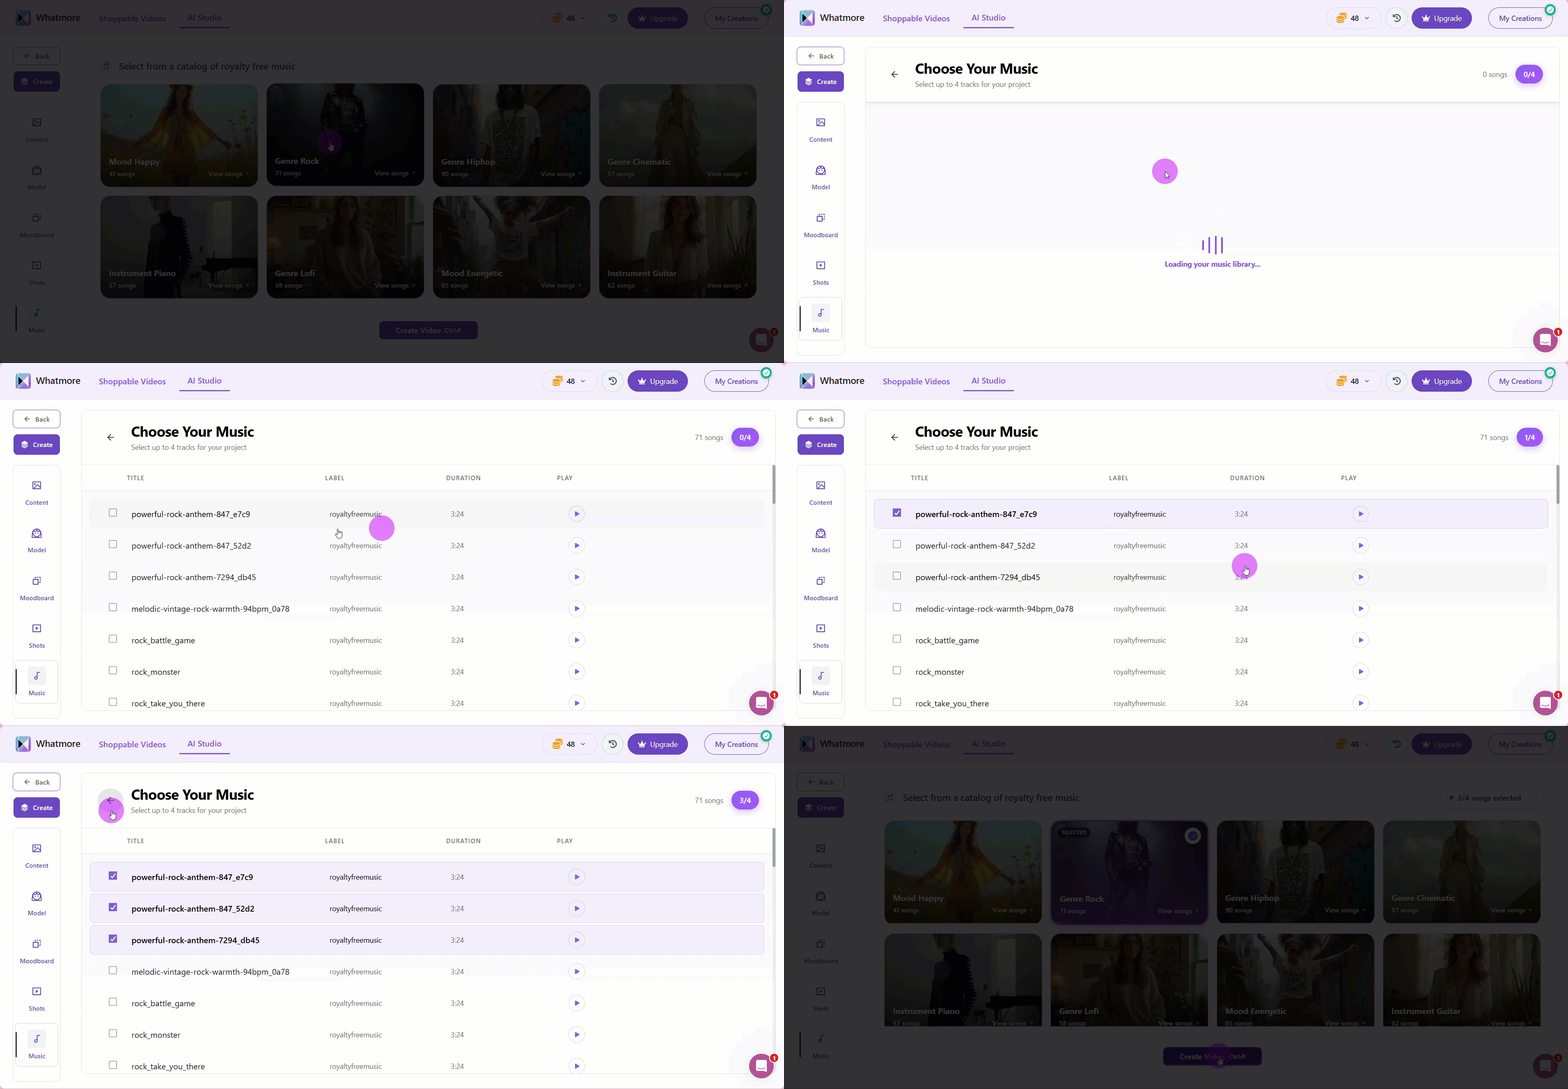
Adding music to your videos can significantly increase engagement and set the tone for your content. The right track helps convey the mood, highlight product features, and keep viewers interested.
To add music:
-
Select the music genre that best aligns with your video’s style or your brand’s identity, such as upbeat, calm, energetic, or cinematic.
-
Click View Songs within the selected genre to explore available tracks.
-
Click the play button next to each track to listen to the sample and find one that resonates with your audience and complements the visuals.
-
Select the songs you want to include in your video. You can select up to 4 songs.
-
Select Create Video to add them to your project.
Consider the platform where your video will be shared. Short, upbeat tracks work well for social media, while longer, atmospheric music can enhance product demonstrations or lifestyle videos.
Review Details
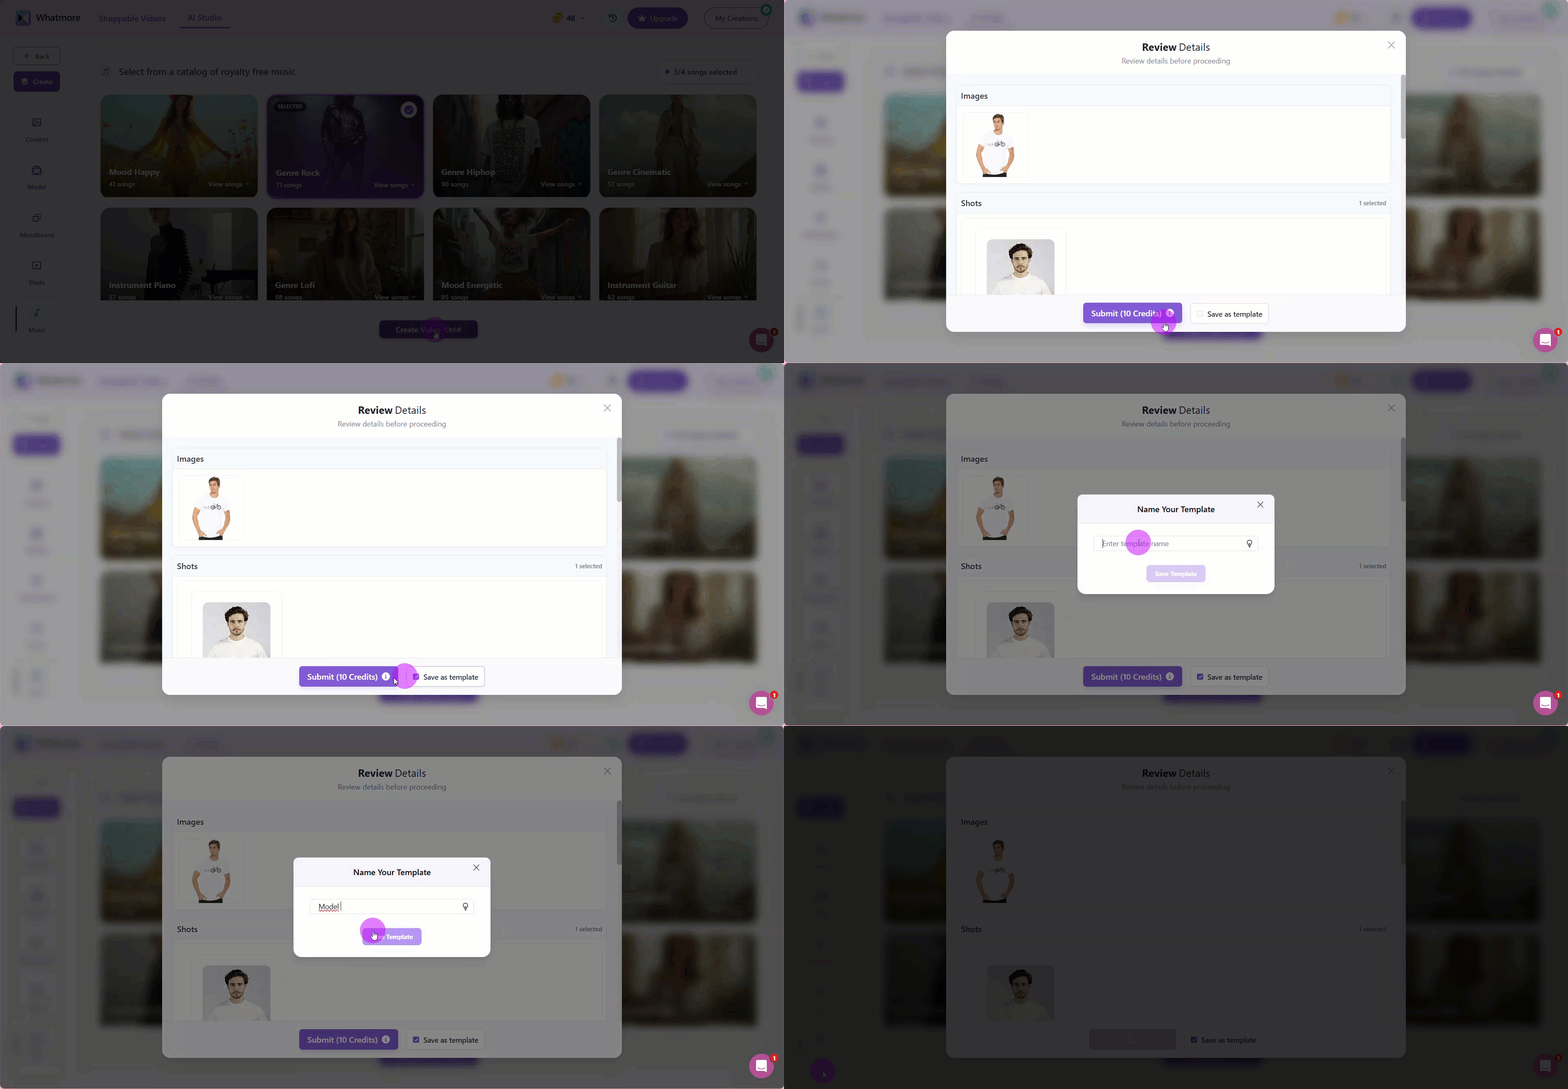
Reviewing your video details before finalizing helps prevent wasted credits and ensures a consistent, professional look. Saving your work as a template can also streamline future projects.
To review details:
-
Click on the images to view them in the gallery.
-
Select the red X button in each image if you wish to delete it.
-
Review the selected model and moodboard. If you wish to change them, go back to the prior steps.
-
Tick the Save as template option if you want to save your current setup as a template for future use.
-
Select the Submit button to continue. It will display the total number of credits that will be consumed for this run.
Your video has been created! You can view them in the My Creations section from the left menu.
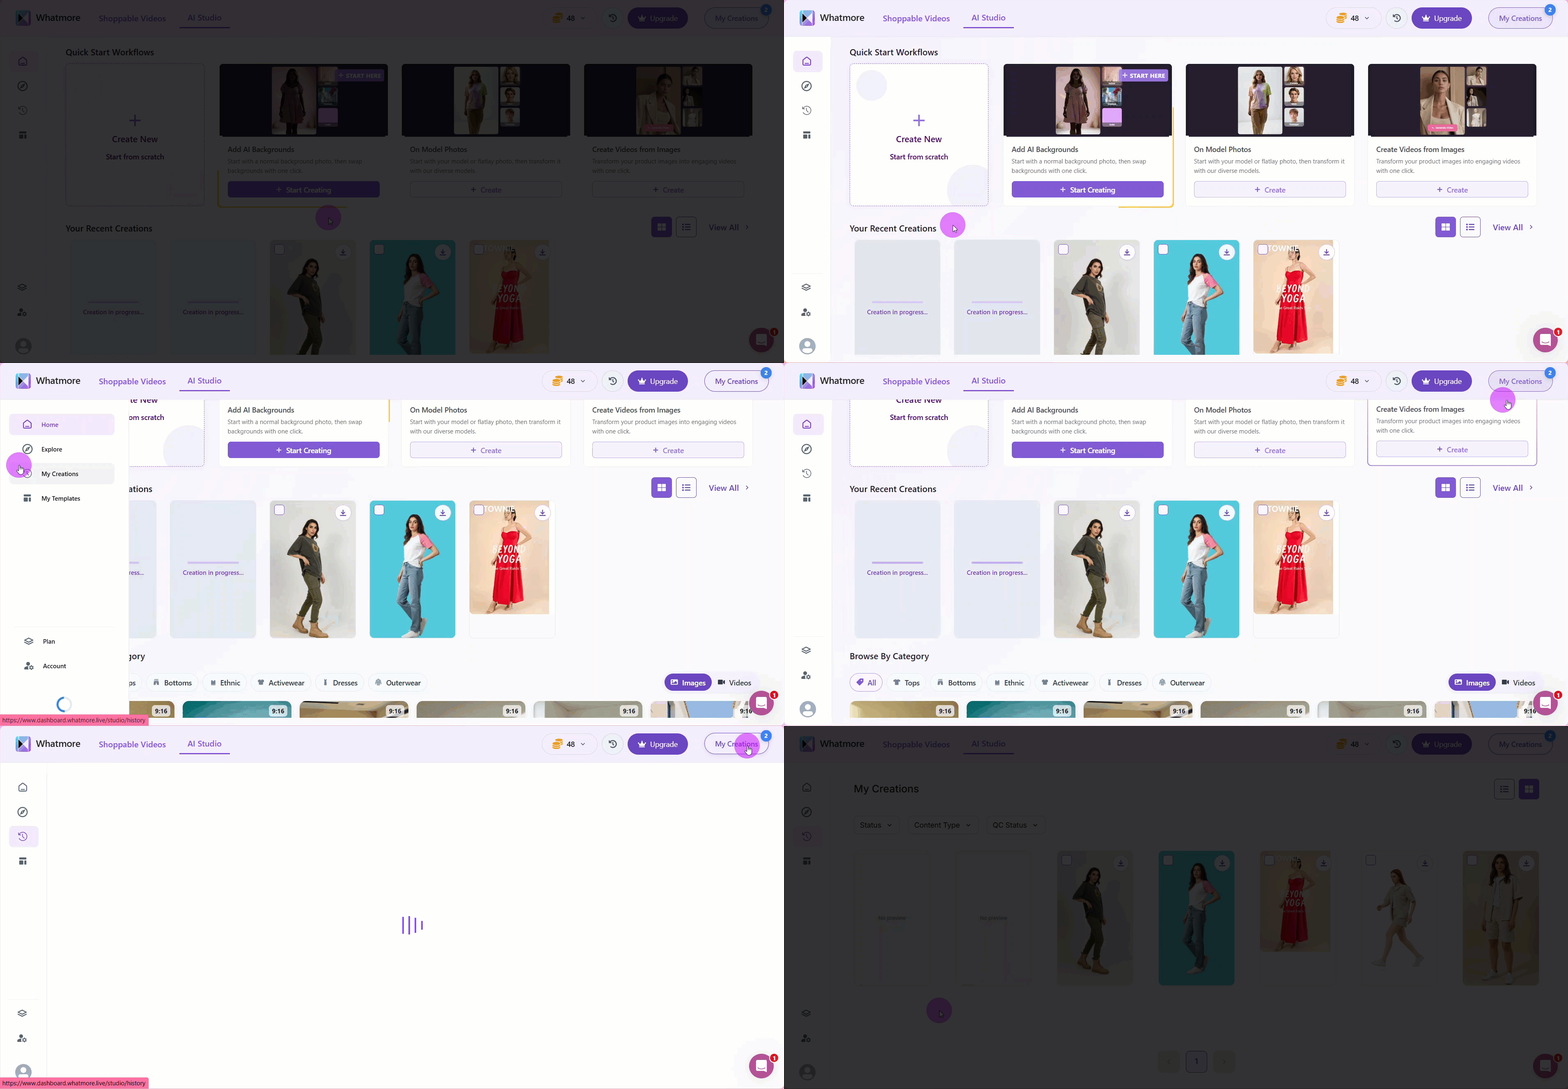
Now you have personalized, professional images ready for publication on marketing channels, catalogs, or social networks!
Supercharge your campaigns by integrating Whatmore with your marketing automation tools and instantly distributing the images you create.
See also
To complement your understanding, view the following pages: